SparkMaker 3D SLA Printer
My Review
First, I want to say that I had a lot of issues with OGadget support. They were not very responsive, they were late shipping my printer, I never received my Resin. It’s been more than a month, and I’ve still not received it. However, now it is on Amazon, and as we know, Amazon is good on shipping. On to the review about the Printer.
The printer itself came packaged VERY nicely. It was surrounded in Styrofoam, it was already assembled, and ready to go. I plugged it, realized I needed a Micro SD Card (Don’t use an adapter with a mini SD card for phones!), headed over to the SparkMaker Facebook Group.
I found out there was a lot of people that had issues with it. I didn’t let it cloud my judgement, and checked, double checked, and triple checked all the concerns that people had. I found that the 2nd batch the company sent out had all the fixes in place.
I cleared out the inside of the print screen (red tube) as it had random Styrofoam pieces in it, I removed the foam from the vat area, and then poured in the UV photosensitive resin in the vat and started the first print.
A note about the software needed to print: The required file for printing is named print.wow. This is only processed by the SparkMaker software. For Mac OSX, it does not translate to English well. For Windows, it works great. You can only have 1 print file on the SD Card at a time. It MUST be named print.wow, no exceptions.
I also had a couple issues with the beginning prints. Each manufacturer of resin has it’s own requirements for curing. Typically I use Wanhao or Monoprice resin (mainly because I never received SparkMaker LCD-T resin), and I use my cure settings as follows:
Layer Thickness (mm): 0.050
Exposure Time Per Layer (seconds): 10.00
Exposure Strength Grade (bit): 255
Bottom Layer Exposure Time (seconds): 60
Lift Distance (mm): 5
Lift Speed (mm/minute): 30
Decline Speed (mm/minute): 100
Overall, I really like the printer. It’s easy to use, it’s fun, and most of all, for the price: It’s everything I could want.
Details Below:
3D Printing is the future! But when we looked at the available 3D printer models on the market, we could not find a single one that delivers high quality printings at a reasonable price.
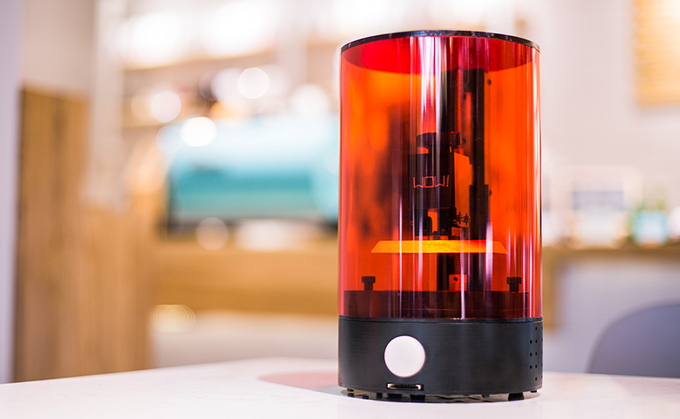
That`s why we made SparkMaker, an LCD based SLA 3D printer that prints in high-resolution yet has a price that makes it affordable for everyone.

SparkMaker is compact, beautiful, and user-friendly. At 10 x 6.7 x 6.7 inches (27.5 x 17 x 17 cm) and a weight of only 6.6 pounds (3Kg), the SparkMaker fits perfectly in any office, studio or workshop.
It is small un size but has room where it matters. The SparkMaker 3D printer has a uniform maximum build areas of 4 x 2.2 inches (10.2 x 5.6 cm) and a build height of 5 inches (12.5 cm).
High Resolution 3D Printing

Printing at 100 micrometer XY resolution and up to 20 micrometer Z layer thickness, SparkMaker has an amazing ability to print in higher resolution compared to DLP 3D printers.
However, an affordable price doesn’t mean we compromised on the quality. The 102 x 56 x 125 print area means that SparkMaker is ideal for scale prototyping as well as general 3D printing.

With SparkMaker, we wanted to make 3D printing as easy and user friendly as possible. Unlike other SLA 3D printers that require a computer connection, SparkMaker supports offline printing.
You can forget about connection problems. Simply insert an SD card with a pre-loaded design, press the print button and your creation begins to take shape.
LED Status Lights
Monitoring your print projects is easier too with SparkMaker. It has a jumbo LED light with three different colors to indicate the printing progress.
 SLA vs FDM Printers
Of course, quality is what we strive for when it comes to our 3D printing endeavors. While the majority of today’s FDM printers will produce a decent model, compare an FDM print to one produced by any SLA 3D printer and you’ll quickly see that SLA takes the lead when it comes to the overall quality of finish.
Beginners Guide
1. Download a 3D print model file from your computer to an SD card.
2. Insert SD card into SparkMaker & fill printer with the desired resin.
3. Press the button and your design begins to print. That`s it!
Common Problems, and Solutions
SparkMaker focuses on improving the printing experience for every printer. We offer basic essential tools for 3D printing including trowel and resin tank. The trowel makes it easy for the printer to slide between the printed object and the build platform. And no worries about how hard to clean the resin tank for next use with an alternative one.
We want to make 3D printing accessible for everyone, so we use affordable resin too. SparkMaker comes with 5 types of resins, each suitable for different objects you wish to create. Combined with the 5 types of color paste included, you can print 3D object in virtually any color you want.
When we designed SparkMaker, we aimed to strip away the clutter and keep things as simple as possible. As a result, SparkMaker has no moving parts that aren’t essential to the printing process. This simplicity allows the SparkMaker to keep running smoothly over t
Why can we make SparkMaker in such a great price?
SparkMaker goes with the mature technology and inexpensive LCD display with UV backlight to curing photosensitive resin layer by layer. The structures of SparkMaker will be made by injection mold. SparkMaker uses our own developed control board but not the expensive Raspberry Pi or other open source control boards.
SparkMaker uses the high precision linear guides instead of plain shaft guides, and high quality stainless steel T2 screw.
These are the key reasons why it can be cost effective but still has a precise dimensional accuracy.
You must be logged in to post a comment.